
When starting out brewing, I often recommend not worrying about calculating the ABV of your beer, especially if it’s your very first batch. In some circles, this is considered a mistake. I have nothing against the practice – in fact I always take original and final gravity readings when I brew. But when you’re just starting out, it adds one more step that could lead to potential contamination, while reducing the final volume of beer you’ll bottle. Let me explain:
First, let’s review what’s involved with taking hydrometer readings.
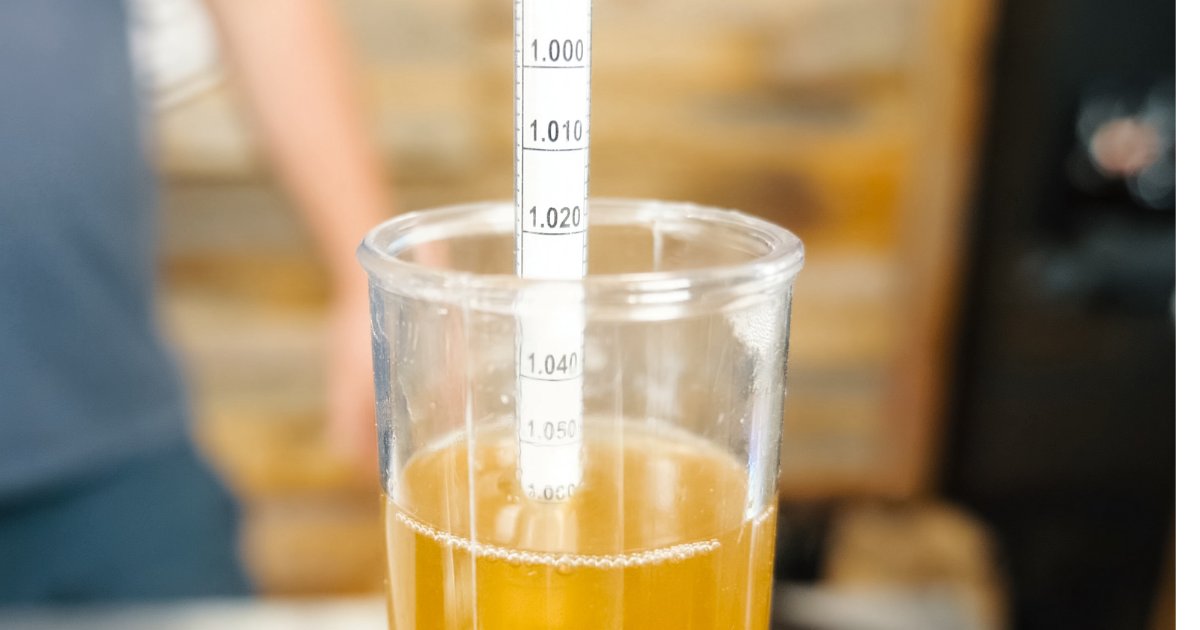
At the end of your boil, after you have cooled the wort and before you pitch the yeast, you would take a sample of the wort, put it in a test tube, drop in your hydrometer, and take an original gravity reading. Let’s pause here for a moment. If you’ve never brewed before, a hydrometer is pretty much a glass tube with a bulb in it that can measure the density of your beer —the amount of sugar, which will eventually convert to sugar. Now, back to our brew day…
You could elect to return that sample to the fermenter, assuming the device you used to take the sample, the test tube, and the hydrometer were all properly sanitized. Then, at the end of fermentation—before you bottle your beer—you would take a final gravity reading. The difference between your original gravity and final gravity gives you your ABV. The Internet has handy ABV calculators that make this calculation a breeze.
The basic calculation is this:
( Original Gravity – Final Gravity ) x 131 = % ABV
For example, let’s say your original gravity reading on brew day is 1.054 and the final gravity reading on bottling day is 1.015, your ABV would be 5.12%:
( 1.054 – 1.015 ) x 131 = 5.12%
Your hydrometer also comes with a guide to help you calculate your ABV if you don’t have access to the Internet on brew day.
As I say, easy stuff, and it’s something I always do when I’m brewing, because I can’t help myself – I want to know all the precise metrics of my beer. But…
Here’s why I don’t recommend it for your first brew.
I subscribe to the same belief many home brewers do about returning a sample to the fermenter. It’s just not worth the risk. When I was a five-gallon brewer, I never returned a sample to the fermenter. I’d taste it then toss it. But when you’re brewing a five-gallon batch, you barely notice that you’ve removed liquid from your final brew volume. Most hydrometer flasks, including mine, hold 200ml of volume. Take two measurements, and if you toss out the wort, you’re looking at 400ml of lost beer. When you consider that I bottle with 500ml bottles, that’s almost a whole bottle lost! And when you’re brewing 1-gallon batches, you only typically fill up 6 of those bottles. That’s losing a fifth of your beer to hydrometer readings. I don’t know about you, but I’d rather drink that beer!
Your first brew should be stress-free. Taking two hydrometer readings adds additional steps that won’t do anything other than satisfy your curiosity about the final ABV. But in all honesty, if you follow the instructions, you should hit the approximate ABV level identified in your recipe. And if you didn’t hit it on the mark, so what? Consider it your own unique brew. As Julia Childs famously told her viewers, “never apologize!” I say this in jest, of course. You will eventually want to take hydrometer readings as you advance in your craft, but for your very first batch, don’t stress about it.
But if you want to use a hydrometer, here’s how to read it
Reading the hydrometer is pretty easy stuff—but it does require a trip down memory lane…to Grade 6 science class. Once you drop the hydrometer in the wort (careful, you might get some overflow), you give it a little spin to make sure no air is clinging to it. Once it settles down, it will be buoyed at a certain height, which corresponds with a gravity reading on the side of the hydrometer. This is where your science class comes in handy. Remember the meniscus? If you don’t, not to worry — I couldn’t remember either. When you take a look at where the liquid lines up on the hydrometer, you’ll notice that the liquid rises up the sides— the meniscus. It can be tempting to use the top of the meniscus to get the gravity reading, as that’s where the liquid lines up directly. But if you want the most accurate reading, you want to look at the bottom of the meniscus—where the liquid is level (where the plane of the water is, not where it clings up the hydrometer).
Also, some hydrometers are calibrated at 15°C or 20°C. Take a look at your hydrometer’s instructions to see what it’s calibrated at. If your liquid is a different temperature than what the hydrometer has been calibrated for, you’ll need to adjust the reading. The Internet, as always, is our friend. Plenty of good folks have created handy online calculators to make your life easier.
I found this handy video from Northern Brewer, to illustrate the above in ways words cannot:
Is there another way? Yes, yes there is.
It’s called a refractometer.
I eventually got tired of wasting a significant percentage of my wort every time I measured gravity. So, I caved and bought the slightly-more-expensive refractometer. Its major selling point: you only need a drop of wort to take a gravity reading. That’s because it reads gravity by measuring the degree to which light bends when passing through the liquid. Sounds high-tech, right? It is, but here’s why it rocks:
- You only need 2-3 drops to get a reading; and
- It is easier to take pre-boil gravity readings and gravity readings during the boil (which is quite useful when doing advanced brewing and recipe development).
- Temperature correction works as high as 85˚F, so you can take a ready quickly. No need to wait for your wort to cool to room temperature.
But it has some drawbacks you should be aware of. In my view, these are minor, but they are important to keep in mind:
- It requires the use of a calculator to get an accurate ABV reading. Most refractometers measure samples in Brix, which needs to be converted to specific gravity.
- Once the wort starts fermenting and produces alcohol the alcohol changes the overall calculation (the alcohol distorts the reading).You cannot use the naked reading you see in the viewfinder, as you need to adjust for alcohol. So, you need to use a calculator to measure specific gravity, and then another calculator once your wort starts to ferment, to compensate for the presence of alcohol.
Thankfully, the folks at Northern Brewer have made this rather easy with their refractometer calculator. Bookmark that link and follow the instructions.
Again, it’s pretty straightforward, but it means that to calculate the gravity of your fermented beer, you need the current refractometer reading AND the starting gravity. Easy stuff, so long as you keep a record of your starting gravity before fermentation.
I’ve included a video from Northern Brewer, to help you visualize what this all looks like in practice.
Leave a Reply